HK-Mystery-30A
HK Mystery 30A blc mod
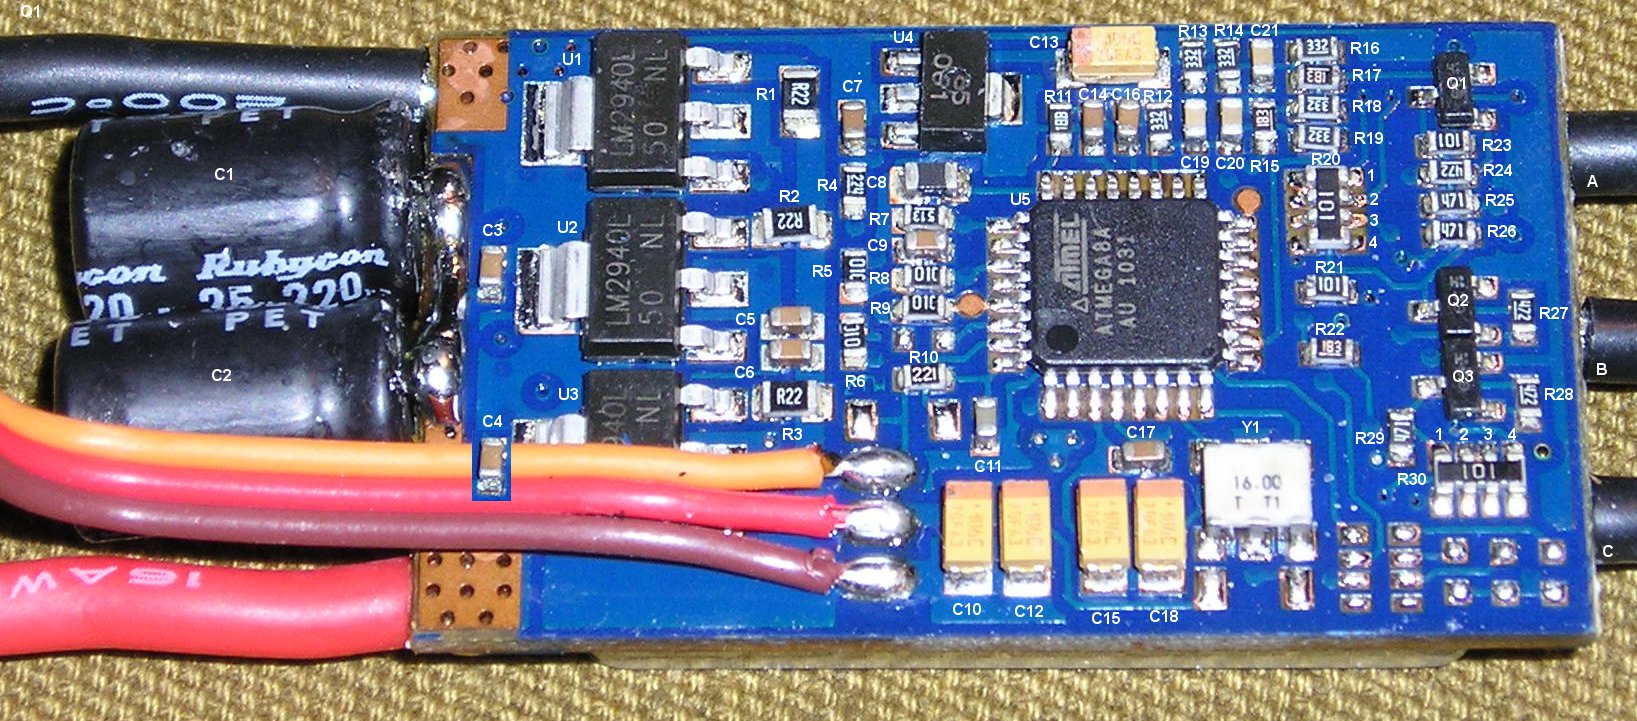
The following thread is going to be about the TWi/I2C mod of the HobbyKing Mystery 30A blc. Some may know it as well as old BlueSeries 30A with n- and p-FETs. Just to make sure we speak about the same thingy, it looks like this:
Thanks
Previously I want to mention, that the schematics and the instruction-pictures of the mod are taken from this post. So thanks to TwisterR for that.
Soldering
First of all you have to solder 2 new wires and cut 2 wires on the blcs. As well you have to solder SCL and SDA wires (red and yellow one of the tripple-cable (the brown one is GND and can be left as it is)) to their new place.
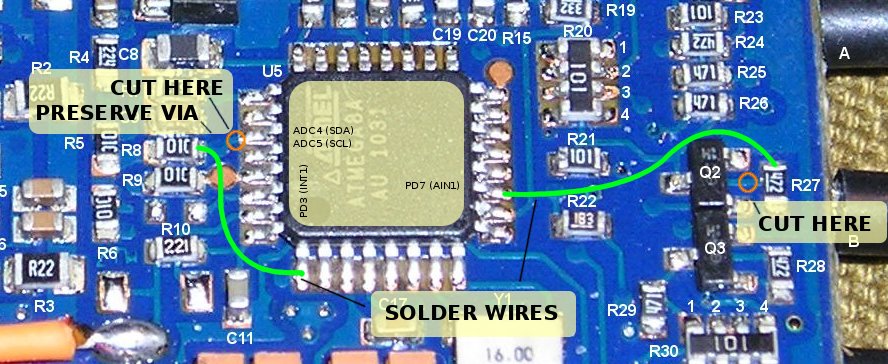
After that you need to solder the wires for the ISP. Yo can do that like this:
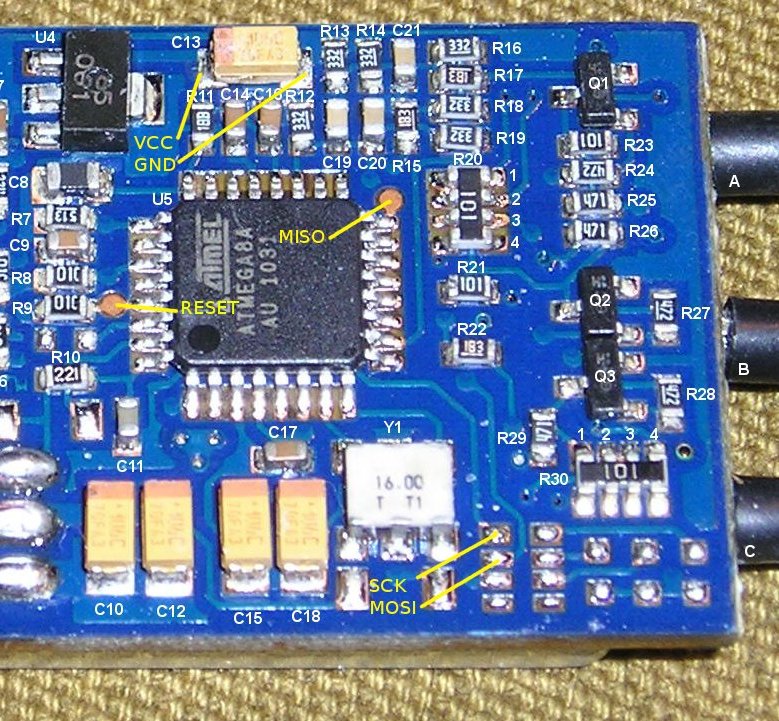
So much for the hardware part. So lets head over to the software.
Flashing
At this point i wanna thank SimonK for the software part.
You can get the files, using this link. Then you need to install avra. I added a coppy in the tgy folder but I am actually not sure if it needs any files that are still on my computer, so better install it from the avra page.
If you did that, go to your console and move to the tgy directory. Then you type “make tp_i2c.hex” and hit enter. This will create a file named tp_i2c.hex. You do this four times while changing the motor_id parameter in the tgy.asm file; it looks like this: “.equ MOTOR_ID = 1”. For sure this will work for Octocopters too, you will just have to name them from 1 to 8.
Well now this is done, you should have te files for the engines 1 to 4. Here it comes to flashing the blcs, meaning, you install the software on the microcontroller. To perform this task you need to install avrdude. While installing you can connect the blc to your lab supply, since it will need external current since the little bit from USB is not enough. Tip: Use a current-limitter with like 0.2A, so if you have a short, nothing will break. Now plug in the USB and open your console again, moving to the directory with the four .hex files. Then you type “avrdude -p m8 -c avrispmkII -P usb -U flash:w:name_of_your_hex_file.hex”. After a few seconds your console should look like this:
% avrdude -p m8 -c avrispmkII -P usb -U flash:w:tp-25a-new-m1.hex

avrdude: Version 5.10, compiled on Jan 19 2010 at 18:43:51
         Copyright (c) 2000-2005 Brian Dean, http://www.bdmicro.com/
         Copyright (c) 2007-2009 Joerg Wunsch

avrdude: AVR device initialized and ready to accept instructions

Reading | ################################################## | 100% 0.01s

avrdude: Device signature = 0x1e9307
avrdude: safemode: lfuse reads as A4
avrdude: safemode: hfuse reads as DF
avrdude: NOTE: FLASH memory has been specified, an erase cycle will be performed
         To disable this feature, specify the -D option.
avrdude: erasing chip
avrdude: reading input file "tp-25a-new-m1.hex"
avrdude: input file tp-25a-new-m1.hex auto detected as Intel Hex
avrdude: writing flash (2132 bytes):

Writing | ################################################## | 100% 0.82s

avrdude: 2132 bytes of flash written
avrdude: verifying flash memory against tp-25a-new-m1.hex:
avrdude: load data flash data from input file tp-25a-new-m1.hex:
avrdude: input file tp-25a-new-m1.hex auto detected as Intel Hex
avrdude: input file tp-25a-new-m1.hex contains 2132 bytes
avrdude: reading on-chip flash data:

Reading | ################################################## | 100% 0.63s

avrdude: verifying ...
avrdude: 2132 bytes of flash verified

avrdude: safemode: lfuse reads as A4
avrdude: safemode: hfuse reads as DF
avrdude: safemode: Fuses OK

avrdude done.  Thank you.
You have to this with all four BLCs, as you my have found out ;)
After having done this, you should her a beeping sequency when you connect a bl-motor to the BLC and power it. If not, something failed and you have to find out what it is (this part of the modding sucks, as i can tell from own experiences…)