Flashing
| Documentation | /Requirements | /PartLists | /Construction | /Tests | /Flashing | /Initialization | Next Chapter |
Installing the Firmware on the NG Hardware
Flashing the firmware on Linux/OS X
Getting the latest firmware release
You can download the files from the Download page.
You will get a folder called “firmware” containing, amoung others, the following files:
- ngos.hex – the firmware for the LPC-H2148
- ngos-usb-bl.hex – the bootloader for the LPC-H2148
- ngos-usb.elf – the firmware for flashing via USB to LPC-H2148
- rc-ctrl.hex – the firmware for the RC
- sb-ctrl.hex – the firmware for the SB
Flashing the LPC-H2148 firmware
There are several ways to flash the hex file for the LPC2148: Via its serial port (UART/ISP), through a JTAG adapter or through its USB port. The last option (USB port) is only possible after having installed a special firmware that supports this procedure - initially this won’t be the case. Hence, when you flash the LPC for the first time, you have to use UART/ISP or JTAG.
Note: If you have a JTAG adapter, use it, because it’s faster and easier than the UART/ISP technique.
Flashing via UART/ISP
The LPC has a serial bootloader embedded, listening on UART0 on the LPC2148.
To enter bootloader mode at…
- HW 0.21:
- The Jumper JP-ISP above the BOOT button has to be in the 1-2 position. Power off your NG, hold down the Reset button on the FC and power up the NG again.
- HW 0.22:
- The Jumper JP-ISP above the BOOT button has to be in the 2-3 position. Power off your NG, hold down the BOOT button on the FC and power up the NG again.
- HW 0.22-mini & HW 0.24-mini:
- Power off your NG, hold down the BOOT button an power up again.
… or if your NG console already works simply enter LPCs bootloder by typing “flash isp”.
Now connect a RS232 to 3.3V CMOS converter (see SerCon) or a NGusb converter from your PC to the NG’s X-UART1, RXD and TXD crossed. The converter can be supplied with 3.3V or 5V from the NG via Pin 4. In that case you have to set the JP-U1 Jumper (SJ1 at HW0.22mini/HW0.24) accordingly (see sheet below).
/!\ All UARTs at FC are TTL logic level tolerant only (3.3V and 5V)!
/!\ If your converter is self-supplied, don’t connect Pin 4 or remove the Jumper JP-U1 (SJ1 at HW0.22mini/HW0.24)! Pin 1 of X-UART1 is located next to R26 on the FC PCB (top view).
The NGcon and the MK-SerCon need 5V (set JP-U1 to position 2-3). The NGusb is self-supplied via USB.
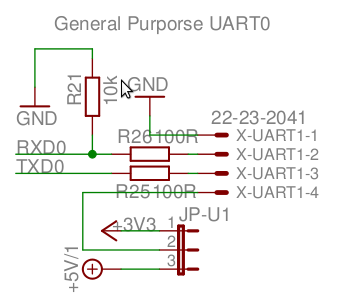
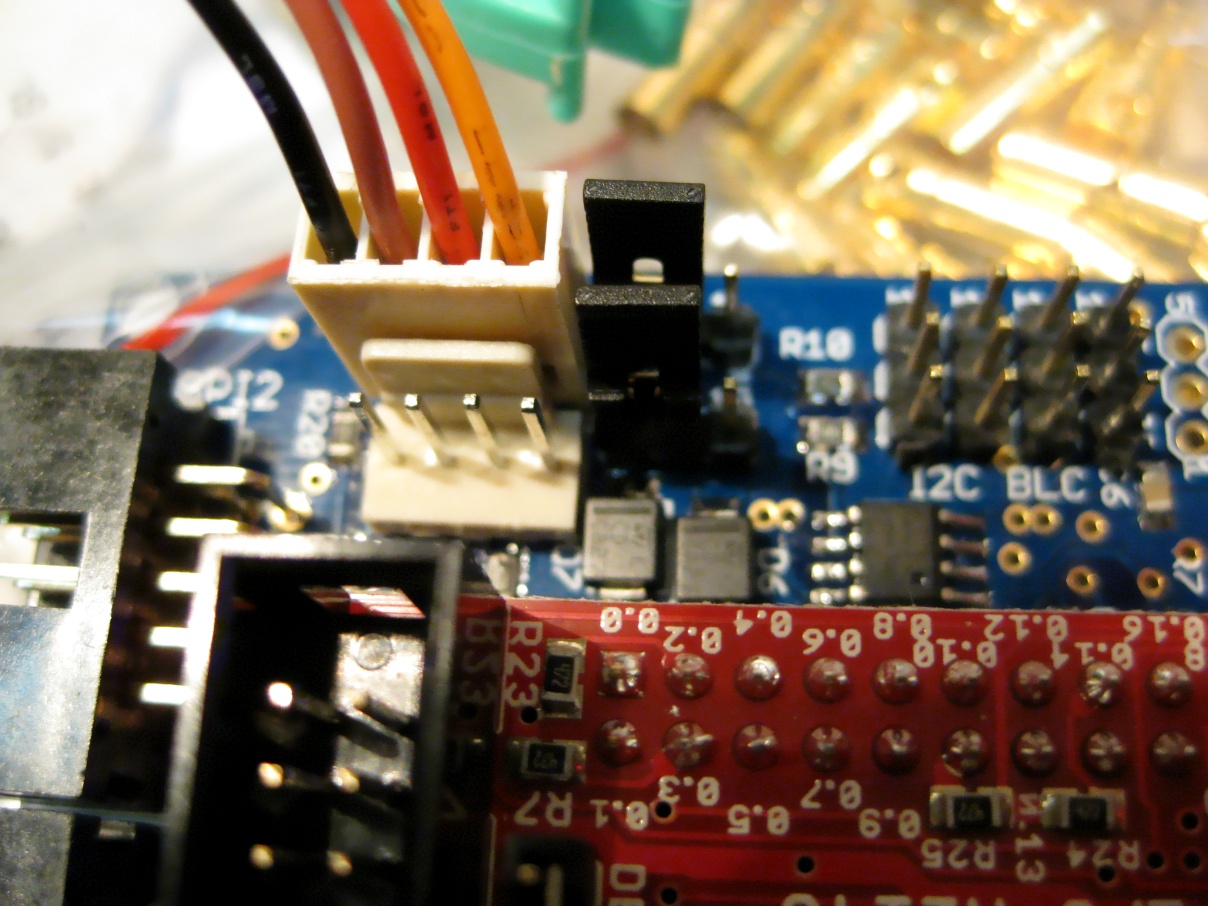
Step-by-step flashing via UART/ISP
The serial flash tool can be found in your release package:
. {{{ ngos-0.xx/tools/cli/linux/lpc21isp }}}
For convenience, you can copy it to /usr/local/bin. After you checked all connections and entered the bootloader mode, start the show with:
. {{{ cd ngos-0.xx/firmware lpc21isp -verify -wipe ngos.hex /dev/ttyUSB1 38400 12000 }}}
Replace the filename and serial port device if necessary. If it takes a long time to sync and you get errors, you might want to throttle the baud rate to 19200.
If everything is ok, you should see something like this:
. {{{ Verify after copy RAM to Flash. lpc21isp version 1.48 File wolferl-ng.hex: loaded… converted to binary format… image size : 255976 Synchronizing (ESC to abort). OK Read bootcode version: 12 2 Read part ID: LPC2148, 512 kiB ROM / 40 kiB SRAM (67305253) Will start programming at Sector 1 if possible, and conclude with Sector 0 to ensure that checksum is written last. Wiping Device. OK Sector 1: …………………………………………………………………………………. Sector 2: …………………………………………………………………………………. … … Sector 0: …………………………………………………………………………………. Download Finished and Verified correct… taking 194 seconds Now launching the brand new code }}}
You should have an operational FC by now, so just cycle power on your NG and have fun!
Automated flashing via UART/ISP
The serial flash executable can be found in your release package:
. {{{ ngos-0.xx/firmware/ngos-serial.sh }}}
Download the file and start it. It will ask you for the serial device to use. After entering the device path, it will automatically start the inlcuded lpc21isp executable and start flashing the LPC using the serial device.
Flashing via JTAG
See JTAG
Flashing via USB/IAP
The code has to be built with –enable-usb-bootloader and –enable-usb-bootloader-switch The ngos-usb-bl.hex has to be flashed with one of the methods described above. After that has been done, all further flashes can (and must) be done via
. {{{ lpc21iap ngos-usb.elf }}}
This should take only about 6 seconds! :-)
To enter the USB bootloader, the jumper JP-ISP has to be in 1-2 position (2-3 for pre 0.21 HW) and the BOOT button has to be pressed while turning on the device. Alternatively, if the shell is already available, instead of pressing any buttons on the FC one might simply enter “flash usb” at the shell.
Verify the successful flashing of the LPC-H2148
After you have flashed the LPC, you can try connecting its USB port directly to your PC.
OSX: Use a tool to list the connected USB devices (OS X: System Profiler) to see if you find a device called “usbmodemDEADC0D1” or similar. That’s the LPC with our firmware.
Linux: Use minicom or similar to connect to /dev/ttyACM0. You should get NGOS shell access.
For further tests, read Initialization
Flashing the Atmel 644p (RC-Controller) firmware
The ISP connector for the 644p needs to be soldered to the side of the FC board, as shown here:
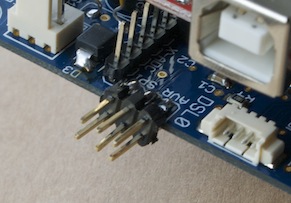
Pin 1 is on the bottom left in the picture.
(Fuse settings to enable: SPIEN, EESAVE, BOOTSZ0, BOOTSZ1, BOOTRST, BODLEVEL1)
First, set the fuse bits with avrdude (Note: Replace “avrisp2” with your programmer’s name, e.g. “dragon_isp” for the AVR-Dragon and “ponyser” for one via SerCon):
. {{{ avrdude -p m644p -c avrisp2 -V -P usb -U lfuse:w:0xff:m -U hfuse:w:0xd0:m -U efuse:w:0xfd:m }}}
/!\ If avrdude shows error messages, check the avrdude troubleshooting page.
To flash the hex file:
. {{{ avrdude -p m644p -c avrisp2 -P usb -U flash:w:rc-ctrl.hex }}}
To figure out the fuse settings for other programmers, just input the above settings into the Engbedded AVR Fuse Calculator (http://www.engbedded.com/fusecalc). Remember that a 0 in the fuse bit registers means the fuse is enabled!
Flashing the Atmel 328p (SB-Controller) firmware
/!\ Attention: This Atmel is running at 3.3V! If you use a SerCon, you need one with a MAX3232 or a resistor-divider in order to access the shell on the SB-Controller! Also be aware that you need a ISP Programmer with level-shifter to be able to programm the Atmel 328P without destroying it (e.g. the AVR-Dragon).
/!\ TODO: Add pics for ISP-Connector, Pinout
(Fuse settings to enable: SPIEN, BOOTSZ0, BOOTSZ1, BOOTRST, BODLEVEL0) This should correspond to the following settings:
- Ext. crystal osc. freq. 8.0-MHz; startup-time PWRDOWN/RESET: 16CK/14CK + 65ms; [CKSEL=1111 SUT=11]
- Boot Reset vector Enabled (default address=$0000); [BOOTRST=0]
- Boot flash section size=256 words; Boot start address=$3F00; [BOOTZ=11] (using default address=$3800 will not work)
- Serial program downloading (SPI) enabled; [SPIEN=0] (DO NOT DISABLE!!)
- Brown-out detection level at VCC=1.8V; [BODLEVEL=110]
Using AVRStudio and AVRISP MKII this corresponds to the following fuses: LOW=0xFF HIGH=0xDE EXTENDED=0xFE, but this may vary among different combinations of programmers and software
To set the Fuses using avrdude:
. {{{ avrdude -p m328p -c avrisp2 -V -P usb -U lfuse:w:0xff:m -U hfuse:w:0xde:m -U efuse:w:0x00:m }}}
- Note 1: Replace “avrisp2” with your programmer’s name, e.g. “dragon_isp” for the AVR-Dragon and “ponyser” for one via SerCon.
- Note 2: The Micromag-3 must be removed for the ISP communication to work.
To flash the hex file:
. {{{ avrdude -p m328p -c avrisp2 -P usb -U flash:w:sb-ctrl.hex }}}
After successful flashing of the 328’s firmware LED2 should turn on (see Signals Page for Details). If it doesn’t, check all voltages and if the fuses are correct (BOOTZ0 correctly programmed? Do NOT disable ISPEN fuse)
/!\ Note to Linux Debian users: avrdude support for the Atmel mega 328p is rather new. It is not included in the avrdude version shipped with Debian release Lenny. Use avrdude from Debian Squeeze instead.
To figure out the fuse settings for other programmers, just input the above settings into the Engbedded AVR Fuse Calculator (http://www.engbedded.com/fusecalc). Remember that a 0 in the fuse bit registers means the fuse is enabled!
Flashing the firmware on Windows
Software needed for flashing
The Windows version of avrdude is included in WinAVR which is available at http://sourceforge.net/projects/winavr/. Be sure to get a recent version that supports the Atmel 328p.
If you use a programmer that uses a USB connection to the PC, such as the AVR Dragon, you need to make sure that you have the correct driver installed:
- If you had previously installed AVR Studio, you need to uninstall its driver first. Go into “Device Manager” (deutsch: “Gerätemanager”), find the driver listed under “Jungo” and Uninstall it.
- Now, when you plug in the USB device (e.g. AVR Dragon), the Hardware Installation Wizard should appear (and the Device Manager shows a yellow question mark for it).
- In the root of your C:\ drive, there should be the WinAVR installation folder. Open it, and go from there into: utils -> libusb -> bin
- In the bin folder, open inf-wizard.exe.
- In that program, choose the AVR Dragon and continue until all is finished (accept all default settings).
- Now plug the USB programmer in so that the Hardware Wizard appears.
- In the Wizard, choose either “Yes, …” (first or second choice)
- On the next page, choose “Install from a list or specific location” (second choice)
- On the next page, choose to “Search for the best driver in these locations” (first choice). Uncheck “Seach removable…”, check “Include this location…” and browse to the bin folder where we were earlier, and which contains the newly created .inf file.
- After several seconds, the new driver should be installed. If you unplug and replug the programmer, no Hardware Wizard should appear, and the programmer should appear in the Device Manager under “LibUSB”.
Now you are ready to use avrdude. To try it out, open the command shell (e.g. by choosing Start -> Run… and entering cmd), and then you can simply enter “avrdude” to see its options, just like on Linux and OS X.
Getting the latest NG firmware release
See above Linux/OS X
Flashing the LPC-H2148 firmware
Flashing via UART/ISP
The steps are the same as described in the Flashing on Linux section. (To enter the commands, open the command shell in Windows, e.g. by choosing Start -> Run… and entering cmd) Only the binaries are different:
You can use the binary installer supplied with your NG release package:
. {{{ ngos-0.xx/firmware/ngos-serial.exe }}} Or, flash a file manually (adjust the COMPort and Hexfile-Name to your needs) . {{{ lpc21isp.exe -verify -wipe ngos.hex COM4 38400 12000 }}}
Flashing via JTAG
See JTAG
Flashing via USB/IAP
The steps are the same as described in the Flashing on Linux section. (To enter the commands, open the command shell in Windows, e.g. by choosing Start -> Run… and entering cmd) Only the binaries are different:
. {{{ lpc21iap.exe ngos-usb.elf }}}
Flashing the Atmel 644p (RC-Controller) firmware
Using avrdude, the steps are the same as described in the Flashing on Linux section. (To enter the commands, open the command shell in Windows, e.g. by choosing Start -> Run… and entering cmd)
Flashing the Atmel 328p (SB-Controller) firmware
Using avrdude, the steps are the same as described in the Flashing on Linux section. (To enter the commands, open the command shell in Windows, e.g. by choosing Start -> Run… and entering cmd)
Troubleshooting
If avrdude fails with “avrdude: Device signature = 0x000000”, try slowing it down with “-B 8”.