UsingGIT
| Development | /UsingSVN | /UsingGIT | /GITCheatbook | Next Chapter |
Using GIT for UAVP-NG
This guide tells you how to use GIT to checkout the source code from the GIT mirror repository and develop on the NG project if you are a NG developer.
Introduction
The UAVP-NG project is switching their source code repository from SVN to GIT. To help you making this step smoothly we present some instructions here.
GIT introduction talks
There are several GIT introduction movies on YouTube:
Basic GIT introductions:
Advanced GIT talks:
- Advanced Git: Graphs, Hashes, and Compression, Oh My!
- O’Reilly Webcast: The Fringes of Git (very interesting)
The UAVP-NG development workflow
Our primary workflow is described in the GIT documentation page as Integration Manager Workflow. It essentially looks like this:
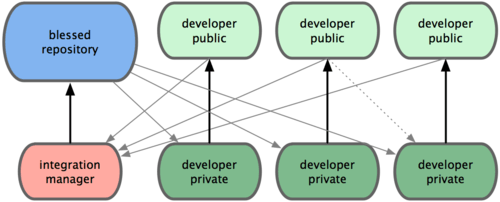
This means, we have a “blessed” public master respository containing our global master branch. Besides that every developer has a public developer repository, where he can push topic branches to. The integration manager (and other developers) are able to access the public developer repositories and so are able to merge changes from them.
Every developer clones the “blessed” public master repository, works with that clone and when satisfied (or earlier, when he wants to exchange topic branches with developer colegues), pushes his topic branches to his public developer repository.
The public developer repositories and the “blessed” public master repository have post-commit hooks informing the uavp-ng Commit Mailinglist of changes.
The UAVP GIT master repositories
This is the UAVP GIT master repositories:
| UAVP Master Repository | git+ssh://git@dev.uavp.ch/uavp/master/sources |
Note:: You will need a NG Developer account and a registered public key to be able to access the above repository.
The UAVP-NG GIT master repositories
These are the UAVP-NG GIT master repositories:
| UAVP-NG Master Sources Repository | git+ssh://git@dev.uavp.ch/uavp-ng/master/sources |
| UAVP-NG Master Hardware Repository | git+ssh://git@dev.uavp.ch/uavp-ng/master/hardware |
| UAVP-NG Master Releases Repository | git+ssh://git@dev.uavp.ch/uavp-ng/master/releases |
| UAVP-NG Master Documents Repository | git+ssh://git@dev.uavp.ch/uavp-ng/master/documents |
| UAVP-NG Master Media Repository | git+ssh://git@dev.uavp.ch/uavp-ng/master/media |
Note:: You will need a NG Developer account and a registered public key to be able to access the above repositories.
The UAVP-NG GIT merge repositories
These are the UAVP-NG GIT merge repositories:
| UAVP-NG Master Hardware Repository | git+ssh://git@dev.uavp.ch/uavp-ng/merge/hardware |
| UAVP-NG Master Documents Repository | git+ssh://git@dev.uavp.ch/uavp-ng/merge/documents |
| UAVP-NG Master Media Repository | git+ssh://git@dev.uavp.ch/uavp-ng/merge/media |
These repositories exist, so that not every developer needs his own Hardware/Documents/Media repository to push to. So all developers share these repositories and use them to publish stuff the integration manager should merge to the master repositories.
Note:: You will need a NG Developer account and a registered public key to be able to access the above repositories.
The UAVP-NG GIT developer repositories
These are the UAVP-NG GIT developer repositories:
| amir | Amir Guindehi | git+ssh://git@dev.uavp.ch/uavp-ng/dev/amir |
| axel | Axel Burri | git+ssh://git@dev.uavp.ch/uavp-ng/dev/axel |
| benjamin | Benjamin Glass | git+ssh://git@dev.uavp.ch/uavp-ng/dev/benjamin |
| christi | Christian Bergmann | git+ssh://git@dev.uavp.ch/uavp-ng/dev/christi |
| cpresser | Carsten Presser | git+ssh://git@dev.uavp.ch/uavp-ng/dev/cpresser |
| felix | Felix Kaiser | git+ssh://git@dev.uavp.ch/uavp-ng/dev/felix |
| florian | Florian Roks | git+ssh://git@dev.uavp.ch/uavp-ng/dev/florian |
| marco | Marco Roehrs | git+ssh://git@dev.uavp.ch/uavp-ng/dev/marco |
| marcus | Marcus Fritzsche | git+ssh://git@dev.uavp.ch/uavp-ng/dev/marcus |
| markusbec | Markus Bechtold | git+ssh://git@dev.uavp.ch/uavp-ng/dev/markusbec |
| mattes | Mattes Jaehne | git+ssh://git@dev.uavp.ch/uavp-ng/dev/mattes |
| matze | Matthias Beckert | git+ssh://git@dev.uavp.ch/uavp-ng/dev/matze |
| mbuhr | Michael Buhr | git+ssh://git@dev.uavp.ch/uavp-ng/dev/mbuhr |
| peter | Peter Wolf | git+ssh://git@dev.uavp.ch/uavp-ng/dev/peter |
| ralf | Ralf Hager | git+ssh://git@dev.uavp.ch/uavp-ng/dev/ralf |
| stefan | Stefan Agner | git+ssh://git@dev.uavp.ch/uavp-ng/dev/stefan |
| stefanh | Stefan Hohnstein | git+ssh://git@dev.uavp.ch/uavp-ng/dev/stefanh |
| stefanrado | Stefan Rado | git+ssh://git@dev.uavp.ch/uavp-ng/dev/stefanrado |
| tim | Tim Pambor | git+ssh://git@dev.uavp.ch/uavp-ng/dev/tim |
| timo | Timo Boettcher | git+ssh://git@dev.uavp.ch/uavp-ng/dev/timo |
Our developers use these repositories to exchange the UAVP-NG sources repository among themselfes and with the integration manager.
Note:: You will need a NG Developer account and a registered public key to be able to access the above repositories. On some systems you need to use a new URL syntax: ssh://git@dev.uavp.ch/uavp-ng/dev/stefan
UAVP-NG branch naming convention
To be able to differentiate branches and repositories, we proposed the following naming convention for branches:
[sources|hardware|media|documents]-<topic>and
merge-[sources|hardware|media|documents]-<topic>So a valid branch name would be sources-my-topic-branch or hardware-work-on-0.30. When a developer wants that a branch gets merged to the public master repository, then he can prefix it with “merge” to name it merge-sources-my-topic-branch which will trigger our integrators to merge the branch.
Step 0: Getting UAVP-NG developer access
You need to generate a SSH private and public key and then send the public key to amir@dev.uavp.ch.
Start the SSH-keygen tool by using the following command to generate an RSA authentication key:
  $ ssh-keygen -t rsa
  Generating public/private rsa key pair.
  ...
Enter the path to the file that will hold the key: By default, the file name $HOME/.ssh/id_rsa, which represents an RSA v2 key, appears in parentheses.
Enter file in which to save the key (/home/<user>/.ssh/id_rsa): <return>Enter a passphrase for using your key: The passphrase you will enter will be used for encrypting your private key. A good passphrase should be alphanumeric having 10-30 character length. You should not also use the null passphrase as it is a loophole for the security.
Enter passphrase (empty for no passphrase): <type the passphrase>Re-enter the passphrase to confirm it: Type your passphrase once again to confirm it.
  Enter same passphrase again: <type the passphrase>
  Your identification has been saved in /home/<user>/.ssh/id_rsa.
  Your public key has been saved in /home/<user>/.ssh/id_rsa.pub.
  The key fingerprint is:
  0b:fa:3c:b8:73:71:bf:58:57:eb:2a:2b:8c:2f:4e:37 <user>@foo.bar
After this process you have the file /home/<user>/.ssh/id_rsa.pub which contains your SSH Public Key. Now create an email and send this SSH Public key to amir@dev.uavp.ch so he can create your access rights…
Step 1: Setting up GIT
Let’s setup some git configurations…. Let us configure your user:
  git config --global --add user.name "<your-fullname>"
  git config --global --add user.email "<your-email>"
Optinal you can setup your GPG signing key too:
git config --global --add user.signingkey "<your-gpg-signing-key-id>"Let’s define some aliases:
  git config --global --add alias.st status
  git config --global --add alias.co checkout
  git config --global --add alias.br branch
  git config --global --add alias.logg "log --color --graph --pretty=format:'%Cred%h%Creset -%C(yellow)%d%Creset %s %Cgreen(%cr) %C(bold blue)<%an>%Creset%n' --abbrev-commit --"
Now let us configure some additional useful features (you can choose your own editor here):
  git config --global --add color.ui true
  git config --global --add core.editor "/usr/bin/emacs -nw"
UNIX users should also set:
  git config --global --add core.autocrlf input
  git config --global --add core.withespace trailing-space,space-before-tab,indent-with-non-tab
And Windows users should set:
  git config --global --add core.autocrlf true
  git config --global --add core.withespace trailing-space,space-before-tab,indent-with-non-tab
Last, but not least, if you use a proxy add the following configuration even trough it’s only used for http/https connections:
  git config --global --add http.proxy <proxy-host>:<proxy-port>
  git config --global --add https.proxy <proxy-host>:<proxy-port>
Step 2: Cloning the repository
As a first step you want to clone the “blessed” public master repository. You do that by issuing the following commands:
  mkdir -p git/dev.uavp.ch
  cd git/dev.uavp.ch
  git clone git+ssh://git@dev.uavp.ch/uavp-ng/master/sources uavp-ng-sources
  cd uavp-ng-sources
  git status
After this you are inside of your own clone of the public master repository.
/!\ Our GIT server dev.uavp.ch is security paranoid! Connecting more than 3 times with a not accepted ssh key will block your IP forever. Please contact Amir should that happen. He is able to unblock you.
Step 3: Setting up GIT Push/Pull
Now you can add remotes for the public developer repositories of your developer collegues and your own:
  git remote add <your-username> git+ssh://git@dev.uavp.ch/uavp-ng/dev/<your-username>

  git remote add <developer-name1> git+ssh://git@dev.uavp.ch/uavp-ng/dev/<developer-name1>
  git remote add <developer-name2> git+ssh://git@dev.uavp.ch/uavp-ng/dev/<developer-name2>
  git remote add <developer-name3> git+ssh://git@dev.uavp.ch/uavp-ng/dev/<developer-name3>
  ...
Having done that, your git remote setup could look similar to this:
  $ git remote -v
  origin  git+ssh://git@dev.uavp.ch/uavp-ng/master/sources (fetch)
  origin  git+ssh://git@dev.uavp.ch/uavp-ng/master/sources (push)
  amir    git+ssh://git@dev.uavp.ch/uavp-ng/dev/amir (fetch)
  amir    git+ssh://git@dev.uavp.ch/uavp-ng/dev/amir (push)
  stefan  git+ssh://git@dev.uavp.ch/uavp-ng/dev/stefan (fetch)
  stefan  git+ssh://git@dev.uavp.ch/uavp-ng/dev/stefan (push)
  ralf    git+ssh://git@dev.uavp.ch/uavp-ng/dev/ralf (fetch)
  ralf    git+ssh://git@dev.uavp.ch/uavp-ng/dev/ralf (push)
  ...
You can also add remotes for the merge repositories:
  git remote add hardware git+ssh://git@dev.uavp.ch/uavp-ng/merge/hardware
  git remote add documents git+ssh://git@dev.uavp.ch/uavp-ng/merge/documents
  git remote add media git+ssh://git@dev.uavp.ch/uavp-ng/merge/media
Step 4: Creating a topic branch
Let’s create your first (tracked) topic branch:
  $ git branch sources-my-first-testbranch
  $ git checkout -t sources-my-first-testbranch
  Switched to a new branch 'sources-my-first-testbranch'
You can do this in one step also:
  $ git checkout -t -b sources-my-first-testbranch
  Switched to a new branch 'sources-my-first-testbranch'
Step 5: Working in a topic branch
Having checked out your topic branch in step 3, you now can start working on the repository files.
Let’s say, you’ve changed a file, and want to commit it to your own local git repository. You do that with the following commands:
  $ cd sources/ngos
  $ emacs README.txt # make some changes
  $ git add README.txt
  $ git commit -m '<commit-message>'
You can repeat the above steps to make several changes and several commits. Note that you do not need a network connection for this, you are committing to your own local clone of the “blessed” public master repository.
Step 6: Pulling changes from “blessed” central repository
Having worked on your topic branch, the master branch in the public master repository diverged from your branch. So if you want to keep up with the master respository, you need to fetch the last changes from there.
To do that, you first have to fetch the current master branch from the public master repository:
  $ git checkout master
  $ git fetch
  $ git pull
Your master branch is up-to-date again and in-sync with the “blessed” public master repository of the project.
Step 7: Pull (rebase) changes from “blessed” central repository
Having done that, your repository contains the newest changes in the master branch. You will need to rebase your topic branch on the master branch to get all those changes inserted before your new not yet pushed changes in your local branch. Your topic branch is a tracking branch, so it knows where it branched from. You can pull the changes from the original branch while putting your own branch’s changes on top of these changes by:
  $ git checkout sources-my-first-testbranch
  Switched to branch 'sources-my-first-testbranch'
  $ git pull --rebase
Step 8: Verify topic branch before publishing
TODO
Step 9: Pushing topic branch to public developer repository
Having rebased master we are sure that we are up-to-date and our changes should apply cleanly to the master branch in the “blessed” public master repository. So it’s time to push our changes to our public developer repository for your fellow developer to be seen.
  $ git push <your-username> sources-my-first-testbranch

  Compressing objects: 100% (3/3), done.
  Writing objects: 100% (3/3), 334 bytes, done.
  Total 3 (delta 2), reused 0 (delta 0)
  Auto packing the repository for optimum performance.
  To git+ssh://git@dev.uavp.ch/amir
   * [new branch]      sources-my-first-testbranch -> sources-my-first-testbranch
Your new topic branch has been published and a commit email has been sent to the uavp-commit Mailinglist. The project integrator will look at your branch and merge it if possible.
Step 10: Pulling your changes from “blessed” central repository after merge
After the project integrator has merged your branch, you will receive the updated master branch when pulling from the “blessed” public master repository:
  $ git checkout master
  $ git pull
Step 11: Deleting a topic branch from your public developer repository
Deleting a remote branch is easy:
$ git push <your-username> :sources-my-first-testbranchAn even easier way is to use:
$ git push --delete <your-username> sources-my-first-testbranchUseful commands
Renaming a branch (e.g. to rename a testing-branch to a merge-branch)
$ git branch -m [<oldbranch>] <newbranch>Useful GIT aliases
Add them to your Git configuration file manually by adding the [alias] section to the file ~/.gitconfig:
[alias]
  st = status -s
  ...
alias.st=status -s
alias.cl=clone
alias.ci=commit
alias.co=checkout
alias.br=branch
alias.diff=diff --word-diff
alias.dc=diff --cached
alias.svnup=svn rebase
alias.svnpull=pull --rebase
alias.logg=log --color --graph --pretty=format:'%Cred%h%Creset -%C(yellow)%d%Creset %s %Cgreen(%cr) %C(bold blue)<%an>%Creset%n' --abbrev-commit --
alias.ls=log --pretty=format:"%C(yellow)%C(bold)%h%Cred%d - %Creset%s%C(blue)%C(bold) [%cn <%ae>]" --decorate
alias.ll=log --pretty=format:"%C(yellow)%C(bold)%h%Cred%d - %Creset%s%C(blue)%C(bold) [%cn <%ae>]" --decorate --numstat
alias.lnc=log --pretty=format:"%h %s [%cn <%ae>]"
alias.lds=log --pretty=format:"%C(yellow)%C(bold)%h %ad%Cred%d - %Creset%s%C(blue)%C(bold) [%cn <%ae>]" --decorate --date=short
alias.ld=log --pretty=format:"%C(yellow)%C(bold)%h %ad%Cred%d - %Creset%s%C(blue)%C(bold) [%cn <%ae>]" --decorate --date=relative
alias.ls=log --pretty=format:"%C(yellow)%C(bold)%h%Cred%d - %Creset%s%C(blue)%C(bold) [%cn <%ae>]" --decorate
alias.filelog=log -u
alias.fl=log -u
alias.dl=!git ll -1
alias.dlc=diff --cached HEAD^
alias.dr=!f() { git diff $1^..$1; }; f
alias.lc=!f() { git ll $1^..$1; }; f
alias.diffr=!f() { git diff $1^..$1; }; f
alias.f=!git ls-files | grep -i
alias.find=!git ls-files | grep -i
alias.grep=grep -Ii
alias.gr=grep -Ii
alias.gra=!f() { A=$(pwd) && TOPLEVEL=$(git rev-parse --show-toplevel) && cd $TOPLEVEL && git grep --full-name -In $1 | xargs -I{} echo $TOPLEVEL/{} && cd $A; }; f
alias.la=!git config -l | grep alias | cut -c 7-
alias.lasttag=describe --tags --abbrev=0
alias.lt=describe --tags --abbrev=0
alias.cp=cherry-pick
alias.r=reset
alias.r1=reset HEAD^
alias.r2=reset HEAD^^
alias.rh=reset --hard
alias.rh1=reset HEAD^ --hard
alias.rh2=reset HEAD^^ --hard
alias.sl=stash list
alias.sa=stash apply
alias.ss=stash saveYou can also use the command line like this:
git config --global --add alias.st "status -s"Notes for using (msys)git under Windows
If you’re using msysgit out-of-the-box with windows (as of msys-git 1.8.0), you won’t be able to clone the repository, due to an ancient ssh-version being shipped with openssh. This leads to Openssh (and also plink from putty) not being able to match key-exchange algorithms with the server and failing. If you install msys-git, make sure not to check “use tortoiseplink” (or if already installed, delete the GIT_SSH environment variable) and update the ssh-files in %ProgramFiles%\Git\bin with more recent files.
Older documentation
Obsolete documentation: Using GIT with a SVN central master repository